Level 4. Roles in Testing. Test Design
Level 4
Roles in Testing. Test Design
It's not obvious from the title what this lesson is about. Put simply, today you'll learn what testers actually do and which tasks come with the profession. It's a broad topic: it covers not just the Junior QA specialization but every position that exists in the testing field. It's very important to know who is who at your future job.
So, let's take a look at the development process ->
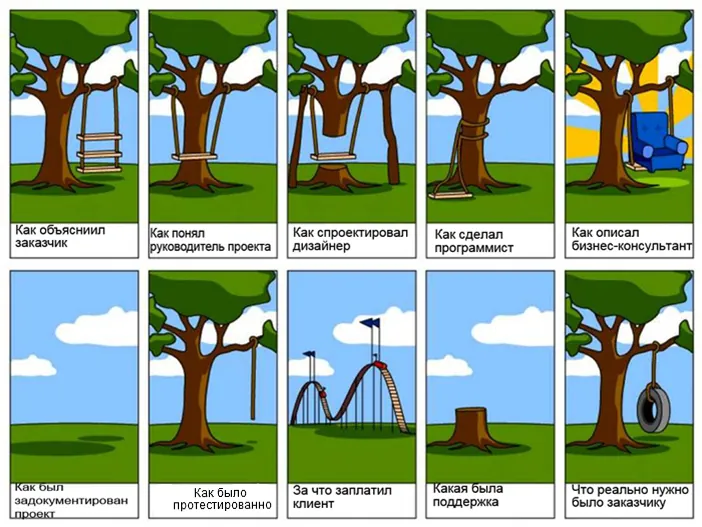

The picture is a joke, of course. But as they say, there's a grain of truth in every joke. It vividly shows the imbalances in the world of IT development, and the order of the process is clear right away.
But right now we're interested in what happens inside the circle of testers. So we'll focus on Roles in testing, which are the positions and job duties in the testing hierarchy, as well as Activities, which is what these people actually do. Over my career I've tried on every one of these roles myself, so I'm happy to introduce them to you, but I'll say right away that a beginner tester won't have to deal with all of them at once.
Software Testing Process Activities
The whole testing process is represented by roughly 20 main activities:
- To structure the activities by stage more clearly, we'll go through them in groups matching the stages of the testing work.
- Not all activities are strictly mandatory, but most of them are recommended.
So, which roles exist in testing:
Role
Description


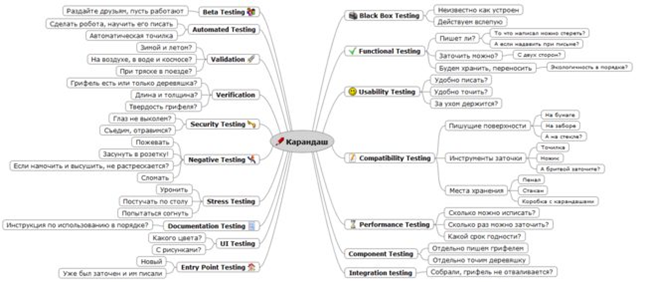
Around the roles and tasks tied to testing and quality assurance, several opposing schools of thought have formed, and their followers cultivate them diligently. The points of view are largely opposite and contradictory. On the one hand, testing is seen as a semi-mechanical process that requires no special qualifications: the tester is pictured as a "clicker" who just pokes at the application, waits for it to "crash," happily reports the bug, and carries on in the same way.
But you and I have a completely different approach. The era of simple clicking is long gone, and effort, time, and resources are managed with the Agile or RUP methodologies. And behind that famous mouse-clicking lie the test design techniques.
I'll let you in on a secret every IT person knows. Everyone says they follow some methodology and proudly declares, "We do everything by the Scrum book." But in the real world every company has its own microclimate and its own rules, which get layered on top of the chosen methodology. Let's take a closer look at these methodologies. Actually, wait, first let's find out what the forces of evil are up to in the meantime!

And where will I fit in this table??? They'll probably make me a test manager right after the course and drive me home in a red sports car...
Oh yes, keep dreaming! Junior roles are Tester and Test Designer. These are the basic roles every tester needs. You'll learn to run tests and write tests in this course. As for test analysis, that only comes with experience. Once you've gathered enough knowledge about the project, you'll be able to analyze other testers' test cases and poke holes in them at a glance!! Or at least spot the shortcomings and, just as importantly, the redundant steps and checks.
As for Test Manager, that's of course the top tier, but you will learn to create a test plan, which includes all the roles listed above, and you'll get to enjoy being a test manager yourself.
Next, more about the activities within the testing roles.
Companies around the world are working to create higher-quality products in less time. To reach this goal, many vendors have started adopting agile development methodologies. This approach helps bring a product to market faster, improve its quality, and boost productivity.
And now the truth. The truth is that Agile is a trendy process at the moment and every company wants to use it. So knowing this methodology is a big plus on a resume, and sometimes even a necessity. But even though everyone wants to use Agile, few actually do, because Agile calls for daily meetings and regular retrospectives. Let's look at the agile development methodology in more detail. Its essence is shown in the diagram:
Agile is a family of development processes that unites the principles of all agile methodologies. Agile doesn't prescribe step-by-step guides or specific recommendations; it only outlines the general principles that agile methodologies use. These principles largely form the basis of the two most widespread agile methodologies, Scrum and Kanban.
It's in your interest to read up on Scrum and add this magic word to your resume :')
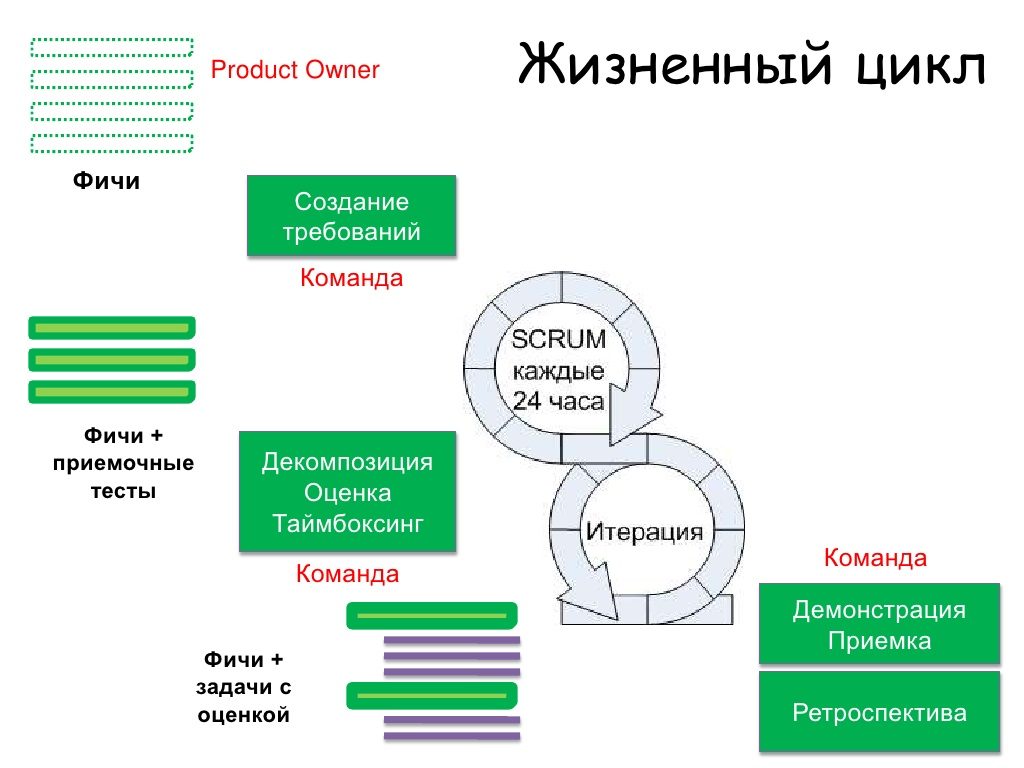
Agile methodologies aim to minimize risk by breaking development into a series of short cycles called iterations, which usually last two to three weeks. Each iteration looks like a miniature software project in its own right and includes all the tasks needed to deliver a small increment of functionality: planning, requirements analysis, design, programming, testing, and documentation. Although a single iteration is usually not enough to release a new version of the product, an agile software project is expected to be ready for release at the end of every iteration. At the end of each iteration, the team reassesses development priorities.
So, we've covered the roles, methodologies, and activities in testing. Now we're ready to move on to the most important practical part of testing. Your ability to test depends on your knowledge and command of test design. It's the "core" of practical testing.


Example of a positive test case (all fields OK):
Actions
Expected result
1. Open the message submission form
- The form is open
- All fields are empty by default
- Required fields are marked with *
- The "Send" button is inactive
2. Fill in the form fields:
- Inquiry type = Consultation
- Contact person = qwertyuiopqwertyuiopqwert
- Contact phone = +38-056-111-11-11
- Message
- The fields are filled in
- The "Send" button is active (Enabled)
3. Click the "Send" button
- The message "Request sent" is displayed on the screen.
- The new request appears in the list on the "Requests" page.
4. Open the message submission form
- The form is open
- All fields are empty by default
- Required fields are marked with *
- The "Send" button is inactive
5. Fill in the form fields:
- Inquiry type = Consultation
- Contact person = @#$%^&;.?,>|\/№"!()_{}[<~
- Contact phone = (916)333-33-33
- Message = qweqweqwe(...)qwe - 1024 characters
- The fields are filled in
- The "Send" button is active (Enabled)
6. Click the "Send" button
- A validation message listing all errors is displayed on the screen:
"The "Contact person" field does not allow digits or special characters." - The request does NOT appear in the list on the "Requests" page.
Level 4 Webinar
Before you do the practical assignment, it will help to watch the webinar dedicated to this level.

Hooray! You've made it to the end of this level!
I know it was very interesting. I enjoy learning together with you, too. But to become a real tester, it's not enough to read the course; you have to remember something from it. Take the test and find out what stuck with you today.

I sense you are gaining the wise eye of a tester. Now put it to use in practice.
Assignment 1 is within your power:
use a test design technique to create a test case. Write a test case for testing the contact form on the cookie website.
To create the test case, use this Google Sheets template.
Assignment 2 is even more interesting:
Test the website and find all the bugs! It's simple! Whatever works wrong is a bug!
Send all the assignments to me through the form

My young Padawan, I have brought you some useful articles for completing the level:
An article on email validation: Email address validation, the hardcore version.
And the antithesis: why the standards are overcomplicated
It's also useful to know:
What formats a postal address can take
To move on to level 5, you need to score at least 19.2 points (60%) on the level 4 assignments.
Test Manager, Test Project Manager
(Test Manager, Test Project Manager)

Provides management oversight.
Responsibilities:
- Provides technical direction
- Obtains the necessary resources
- Provides management reporting
Test Designer

Defines and prioritizes test cases and ensures they are developed.
Responsibilities:
- Develops the test plan
- Develops the test model
- Evaluates testing effectiveness
Tester, Test Engineer
(Tester)

Executes tests.
Responsibilities:
- Executes tests
- Records the results
- Recovers tests and the system after failures
- Documents change requests
Test System Administrator (administers the applications that support the testing life cycle)

Manages and maintains test environments and data. Responsibilities:
- Administers the test management system
- Installs the test systems and manages access to them
Database Administrator, Database Manager

Manages and maintains test data (databases).
Responsibilities:
- Administers test data (databases)
Test Analyst

Establishes and defines the operations, attributes, and relationships of test classes.
Responsibilities:
- Establishes and defines test classes
- Establishes and defines test suites (packages)
Test Developer (Implementer)

Develops unit tests, test classes, and test suites (packages).
Responsibilities:
• Creates test classes, assembles test packages, and integrates them into the test model
Testing Activities in RUP
Roles for testers are the working positions that people hold in the software testing hierarchy. In practice, when you show up for your first day of work, it's logical that everything will start from the tester position. And if you're the only tester at your company, you won't need this scheme at all. But to work at a large company you need to interact well with every role in testing, understand who bears which responsibility, and who is in charge of which aspect of the work.
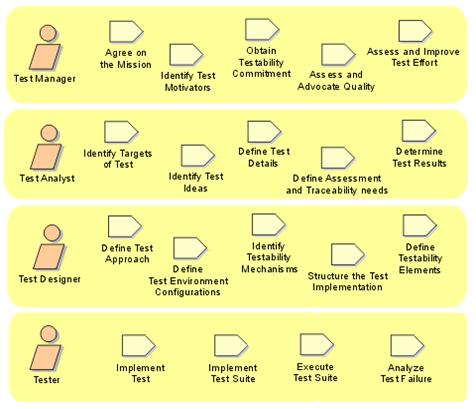
Software Testing Process Activities
- Test planning Defining test requirements Risk assessment Developing the testing strategy Defining resources Creating the schedule/sequences Developing the Test Plan
- Test design (Design Test) Analyzing the scope of work Defining and describing test cases Defining and structuring test procedures Reviewing and evaluating test coverage
- Test implementation (Implement Test) Recording or programming test scripts Identifying test-critical functionality in the Design and the Implementation Model Creating/preparing external data sets
- Test execution (Execute Test) Executing test procedures Evaluating test execution Recovering from failed tests Verifying results Investigating unexpected results Describing the defects found
- Test evaluation (Evaluate Test) Evaluating how well the test cases cover the functionality of the application or system Evaluating code coverage Analyzing defects Defining the criteria for completing and passing testing (metrics analysis)
Practical Aspects of Test Design
Below are the most common test design techniques:
- Equivalence Partitioning (EP). You split all possible value ranges into valid and invalid ones and pick one value from each range. For example, if you have a range of allowed values from 1 to 10, you pick one valid value (inside the interval), say 5, and two invalid values outside the interval: -3 and 12.
- Boundary Value Analysis (BVA). Taking the example above, for positive testing we pick the minimum and maximum boundaries (1 and 10) as values, plus the values just below and above the boundaries (0 and 11). Boundary Value Analysis can be applied to fields, records, files, or any kind of entities that have constraints.
- Cause/Effect (CE). This is typically entering combinations of conditions (causes) to get a response from the system (the effect). For example, you're checking whether you can add a customer using a particular screen form. To do that, you need to fill in several fields, such as "Name," "Address," and "Phone Number," and then click the "Add" button. This is the "Cause." After you click "Add," the system adds the customer to the database and shows the customer's number on the screen. This is the "Effect."
- Error Guessing (EG). This is when a test analyst uses their knowledge of the system and their ability to interpret the specification to "guess" under which input conditions the system might produce an error. For example, the specification says: "The user must enter a code." The test analyst will think: "What if I don't enter a code?", "What if I enter the wrong code?" and so on. That is error guessing.
- Exhaustive Testing (ET) is the extreme case. With this technique you have to check every possible combination of input values, and in principle that should find all the problems. In practice, this method isn't feasible because of the enormous number of input values.



Practice
I can't wait to put this super-important knowledge into practice. Let's work through a classic example, a contact form, and apply test design techniques to it.
Attention, assignment:
Test the functionality of the request intake form. Link to the form.
So, where does testing begin? This is far from a rhetorical question. Testing begins with requirements.
Let me share a secret about requirements: they aren't always written down explicitly, and what's more, there may be none at all, or they may exist only verbally. So an experienced tester has to be able to form the software requirements on their own, based on the description, the technical specification, mockups, product discussions in meetings, and common sense.
Let's look at the requirements for testing this form. For convenience, they're presented in the following table:
Element
Element Type
Requirements
Inquiry type
combobox
Data set:
- Consultation
- Conducting testing
- Advertising placement
- Website error
* - does not affect the request intake process.
Contact person
editbox
1. Required field
2. Maximum 25 characters
3. Digits and special characters are not allowed
Contact phone
editbox
- Required field
- Allowed characters: "+" and digits
- "+" may only be used at the start of the number
- Allowed formats: starts with a plus - 11-15 digits
+31612361264
+375291438884
without a plus - 5-10 digits, for example:
0613261264
2925167
Message
text area
1. Required field
2. Maximum length 1024 characters
Send
button
State:
1. Inactive by default (Disabled)
2. Becomes active (Enabled) once the required fields are filled in
Actions after clicking
1. If the entered data is valid - the message is sent
2. If the entered data is NOT valid - a validation message
Defining the Test Data Set

- Starting from the field requirements and using test design techniques, we begin defining the test data set. Depending on whether a field is required, we determine which fields need to be checked for an empty value, since it can cause an error (marked [1] in the resulting table)
- Since exhaustive testing isn't feasible because of the huge number of possible value combinations, the first thing to do is define a minimal data set. You can do this with techniques such as Equivalence Partitioning and Boundary Value Analysis. We'll mark these as [2].
- The form has a field of a composite type (digits are used together with symbols) that has a special data format, so selecting test data for it is quite laborious. Within this article we'll limit ourselves to a simple check of the formats and the main requirements described in the request intake form.
- Once the data has been generated with the standard techniques, you can add a number of values based on personal experience (the Error Guessing technique): special characters, very long strings, different data formats, letter case in strings (Upper, Lower, Mixed cases), negative and zero values, the keywords Null - NaN - Infinity, and so on. You can include anything you think might crash the application (in the resulting table [2])
The Result of Applying Test Design
Based on the Cause-Effect technique and, where possible, the available use cases, we'll create a template for the planned test. This document will consist of the steps and expected results of the test, but without specific data, which gets filled in at the next stage of test case development.
Actions
Expected result
1. Open the message submission form
- The form is open
- All fields are empty by default
- Required fields are marked with *
- The "Send" button is inactive
2. Fill in the form fields:
- Inquiry type
- Contact person
- Contact phone
- Message
- The fields are filled in
- The "Send" button is active (Enabled)
3. Click the "Send" button
- If the entered data is valid: The message "Request sent" is displayed on the screen. The new request appears in the list on the "Requests" page.
- If the entered data is NOT valid: A validation message listing all errors is displayed on the screen. The request does NOT appear in the list on the "Requests" page.